A New Mural Project and the Story Behind It

MLK mural Indianapolis

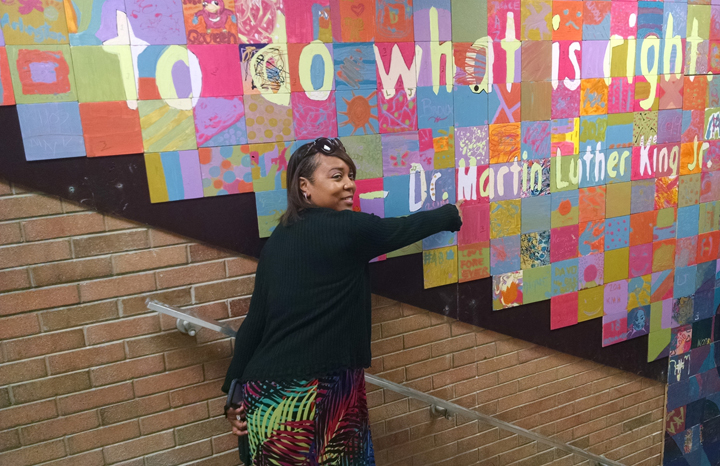
Photo copyright 2018 Sierra Gillard, used with permission from photographer and subject.

Here’s a story worth telling, about art and hopefulness.

Although I’m a fine art painter in my own right, I’ve increasingly found satisfaction in facilitating “non-artists” in the enterprise of art making. I’ve developed an inclusive process by which virtually anyone, including small children and people with physical or mental disabilities, can be a participant in creating a compelling, monumental artwork. (Of course, skilled artists are welcome as well!) This process necessarily involves large numbers of people.

This recent story began with a discussion I had with one of my daughters last Christmas. She and her husband were visiting for the holiday, and I wanted to hear about her new job in Indianapolis. She was teaching at an inner city school there in a pretty rough environment. She recounted that one of the students had been shot over Thanksgiving break, and that when school resumed, fights had been breaking out over the incident.

The high school where she was teaching had combined two different high schools for the current school year. Then at the close of the school year, these high school students were going to be moved again, and the current school was to become a middle school for the next school year.

My daughter recounted conversations she had with students during a time of sharing thoughts. She told me that pretty much across the board the students feel like nothing they do matters to other individuals. Certainly not nationally, but not even locally. Their voices don’t matter. What they do doesn’t matter.

Pointlessness and hopelessness are not good ingredients for creating a culture of life. Especially for a demographic that has a lot stacked against it.

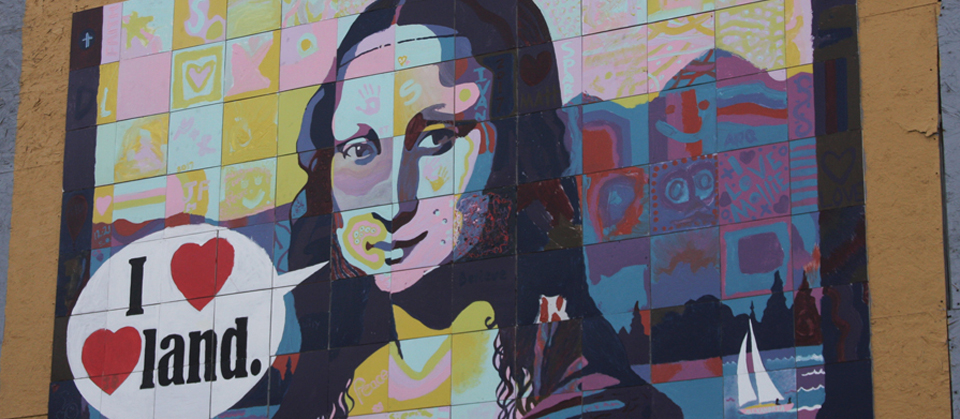
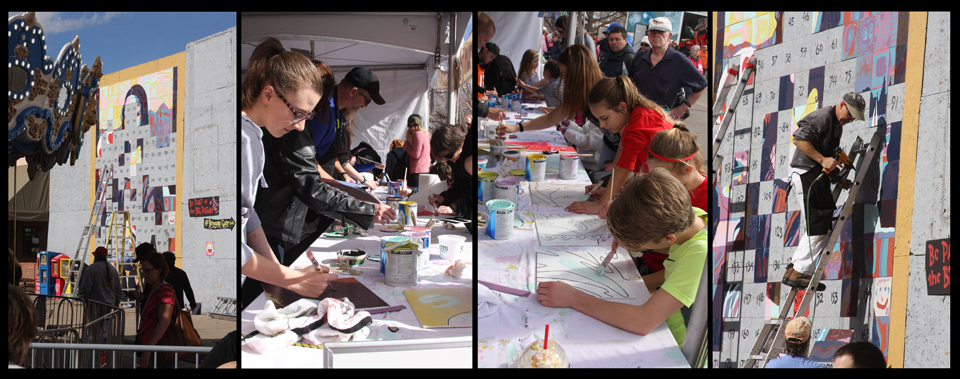
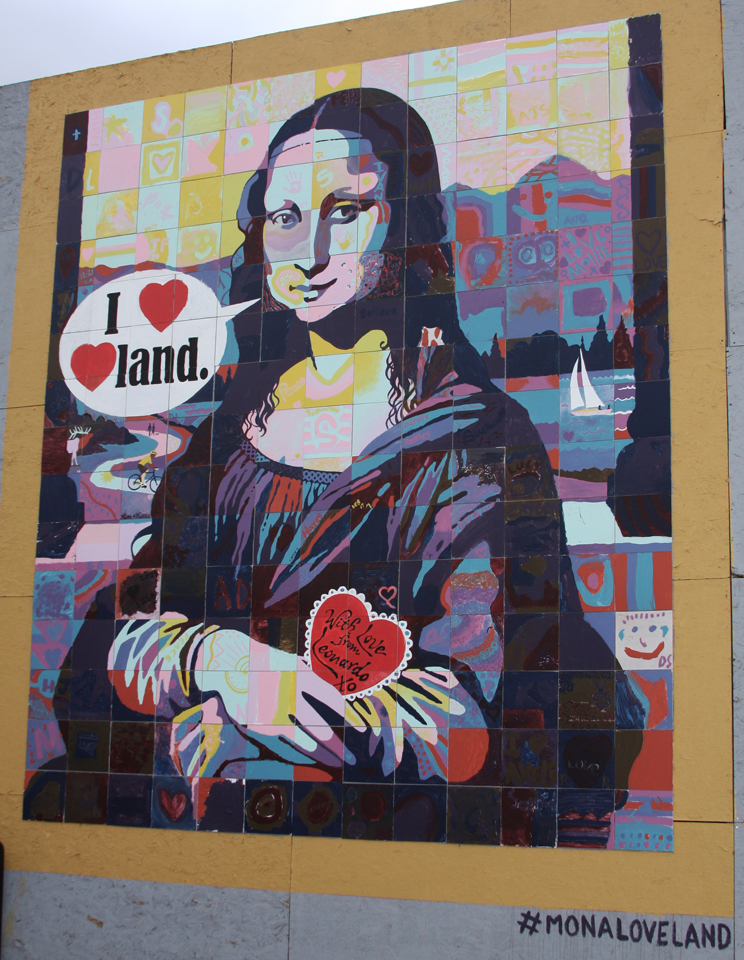
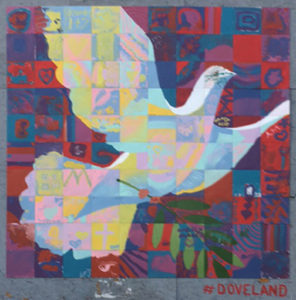
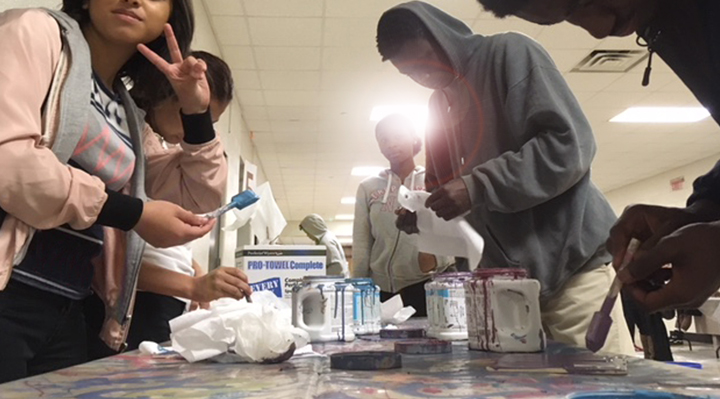
I wondered out loud about how something like the Fire & Ice Festival murals would go over at her school. For the last 2 years, the small church I attend has been helping me put on these big art-making events, each culminating in a giant public mural. The point of the process is that each individual paints a small square of the larger picture. Each tile bears the personal expression of the individual, while contributing to a larger mural that the entire city can enjoy – a colorful metaphor for community.

We envisioned the possibility that the Arlington High School (AHS) students could see such a mural as both a legacy that they could leave to the incoming middle school students, but also be a way that they could leave their individual mark in a creative, positive, and lasting way. It seemed like these students could use something that would feed their souls; to be part of something big and meaningful. I understood that the staff and teachers at AHS already work hard to deliver this, and this seemed like something that I could contribute, even if from a distance.

I cautioned my daughter that it would be a ton of work for her, but she took it on. She ran it past her principal and then the staff. Even without being able to fully know what was coming they said “yes.” I ran the idea past my pastor to see if our church, Beggars’ Gate, would be willing to cover the cost of my time. The high school would cover materials, installation, and its own time. It was now officially a collaboration between a little church in Loveland, Colorado, and a large high school in urban Indianapolis, Indiana.

The school principal approved a design bearing a likeness of Martin Luther King Jr., which was fitting for this year because 2018 is the 50th anniversary of Dr. King’s tragic assassination.

I completed my part and shipped off over 750, six inch square, prepped and coded tiles to Indianapolis. As the painting began at AHS, the students got into it and so did the staff. My daughter had a friend come in and DJ the painting area to create a good atmosphere. Good things happened. Creativity flowed. Dancing ensued.

community art project

Some kids, “hall-walkers” who have not been able to find their place in an academic setting, found their place in this setting.

At least one student who is artistically gifted spent over 2 hours on his 6 inch square tile. He said it was the first time he had used paint.

A Behavior Specialist on staff said, “You know what? If we would’ve done this earlier in the year, I think our kids would’ve done better. It’s inspiring. I’m inspired!”

As the individual painting was going on, no one really knew what was coming. A few kids snuck their tiles out, presumably because they didn’t want to give them up. But when the seemingly random pieces all came together and went up on the wall, the result was spectacular. A lot of hugs were exchanged.

Congrats to Principal Law and the staff and students at Arlington High School – you did a great job!  Thank you Beggers’ Gate Church, for your support!

Martin Luther King Jr memorial

Martin Luther King Jr. Memorial Mural, painted by the students and staff of Arlington High School. Formatted by Scott Freeman, 2018. (12.5 x 25.5 ft)

Obviously, a mural is not going to solve anyone’s problems. But if, at least for some students, it provided some sense of being part of something transcendent; of having a unique place in community; of seeing themselves as being mentors to younger kids; of creative potential breaking out; then I think that’s a good thing. Maybe that’s about the most we can expect from art.

inner city high school project

Find your place in the bigger picture

Getting a vision? Contact me about bringing an experience like this to where you are.
My email is scottnmollie@yahoo.com.

Decorated Eggs from Our Home

Easter eggs

Made by my wife, Mollie. The back side reads, “Jeshua the True Passover Lamb.”

As a family of artists, we have always enjoyed decorating Easter eggs during the Easter/Passover season. We blow out the yolks and date them, so they are kind of biographical. Some are expressions of faith, and some are just silly. Here a few of my favorites, with some notes on how they were made.

Easter eggs, pugs

Pug egg. Egg dye and acrylic paint. Stomach says, “Puppies on the way…” to memorialize the year we bred our pug. Painted by me using egg dye and acrylic paint.

Art eggs, catI wouldn’t say I’m a cat person, but
I made this years ago for a contest at
work when I was employed at Hallmark.
I used egg dye and color pencil. The
ears and tail are made from a kitchen
sponge painted to match.


I often use 3 dimensional fabric paintEaster egg, cock crowing
because I like the texture and the way the paint stands up when it is dry. It’s also easier to use than a brush when writing words. (The paint also unexpectedly created the halo around the rooster.)

The rooster seems like an appropriate Easter image to me because of Peter’s denial of Jesus on Passover night, before the cock crowed.


Here’s another image that most people probably don’t usually associate with Easter:
(The white lines were scratched in with a pin.)

decorated eggs, Jonah and the fish

My wife loves avocados, (and so do I,) so I made this one for her. Plus avocados are kind of already like eggs:
Art eggs

Here are some of my favorites using different media. The top one is egg dye with a fine point Sharpie marker. Mollie used house paint on the middle one. For the bottom one she used bleach with a Q-tip on a dyed egg, and then a Sharpie.
painted eggs
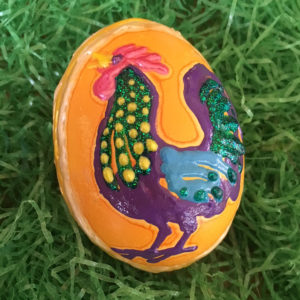
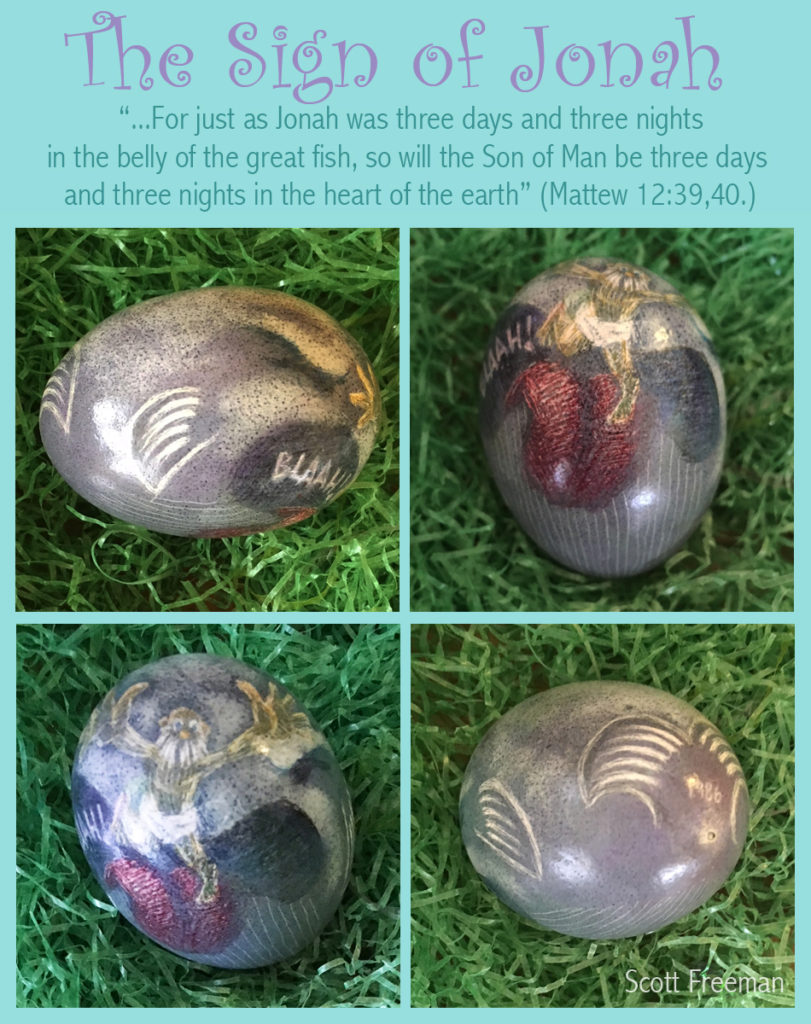
Have you heard of the Easter Armadillo? Me neither, but I just like Armadillos. This was made using a wax crayon resist over a light color dye, and then putting the egg back into a darker dye, with marker on top:
creative easter eggs
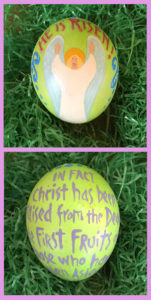
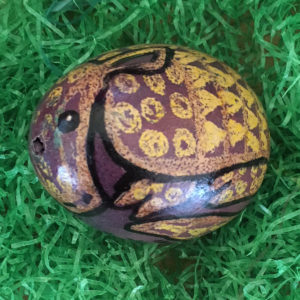
One more. The back of this one quotes    Jesus is risen, angel
1 Corinthians 15:20, “In fact Christ has
been raised from the dead, the first fruits
of those who have fallen asleep.”
Remarkably, Jesus was resurrected on the Jewish feast of Early First Fruits. The
resurrection of Jesus is the promise
of a greater harvest yet to come. What an
amazing promise to ponder!

May you and your family have a
joyous Easter/Passover!


(You can see more of our decorated
eggs if you follow me on Pinterest…)


What Happened at Loveland’s Fire & Ice Festival

public art Scott Freeman Mona Lisa

Just for fun, on Valentine’s Day, I want to tell you about a community art event that I and my church, Beggars’ Gate, put on at the city of Loveland’s Valentine’s Day festival.

I admit I am troubled over how divided and uncivil our nation has become. I got an idea for a project that would bring diverse festival-goers together in a fun, creative process that would end in an exciting collaborative result.

With my peeps at church and the Festival organizers on board, we contacted the owner of a boarded-up building downtown. He gave us permission to beautify his blank wall. Already there was lots of trust going around.

Here’s how it worked:
We laid out a giant 13 x 15 foot grid of 12 inch squares on the wall and painted a gold frame around it. We numbered the squares 1 thru 195. On my studio floor I transferred a (secret) design to 195 wooden foot square tiles. So each tile had part of giant drawing on it. I designated how each area of each tile must be painted in order to make this work: “L” for light, “M” for medium, and “D” for dark paint. Plus a few rare tiles with white, black, and red areas.

At the festival, our small army of volunteers instructed festival-goers in the process. Some of the tiles were impossible to mess up, provided the right color values were used, so even very small children and people with disabilities could (and did!) participate.

It was crazy and fun!

Loveland Fire and Ice Festival

Unfortunately, this being our first time, there was a lot of guessing and estimating going on. We ran out of tiles and completed the image before the end of the second festival day. But Fire and Ice is a three day festival. So…one of my peeps ran out and purchased a stack of floor tiles. Another one cut some that needed cutting until we had another 100 blank squares. We contacted the building owner again for permission to attach a second mural to his wall. I worked into the wee hours to put together a (much simpler!) second design, and we were all ready for day 3 on Sunday.

A pastor friend, (who ended up hanging most of the Mona Lisa image on Saturday,) must’ve been struck with some deep thoughts while nailing up the creative expressions of nearly 200 people. What follows is what he wrote when he went home Saturday night. He read it to our little Beggars’ Gate congregation on Sunday morning. His name is John Meyer, and here are his thoughts:

The Mona Loveland

What do you see?

This community art piece is a great picture of one of the good things we believe about life.

Everyone is an individual, with different talents, different experiences, different likes. It is those differences that make this picture fun, interesting, and a bit unexpected.

But there is a bigger picture that comes together in a way that makes a beautiful whole out of all the individuality. It happened because each individual brought his or her own expression within the plan of an artist who had an intention from the beginning. It would have been nearly impossible for hundreds of individuals to make the Mona Loveland by talking among themselves. But by accepting (even without understanding) the greater plan of the artist, the unique expression of each individual created something that included everyone, and has a greater meaning and beauty that only exists because everyone came together.

We think this is a good picture of God’s plan for life. Each of us is made wonderfully unique by Him. Just as no two snowflakes are alike, and no two sets of fingerprints are alike, every person has unique and wonderful traits that are found in no other life.

But none of us are meant to be a complete picture alone. We are made for community. The Designing Artist has had a plan from the beginning to allow us to experience both our individuality and the greater good of a community living together.

It is from both living out who we are, and expressing that uniqueness within the “lines” and plan the Designing Artist has for each life, that allows us to experience the beautiful picture of human community to come together.

Our goal is to help individuals appreciate their own uniqueness, and to understand the plan of God that allows all of us to experience His good and bigger picture together!”

Beggars’ Gate Church
Loveland, Colorado
beggarsgate.com

Mona Lisa Valentine

The finished mural: “The Sweetheart City’s” own Mona Lisa, painted by local citizens…

I want to extend a big THANK YOU to the army of volunteers who enabled this event to happen for the community. They gave time, energy, and resources to make this event free for everyone else. ‘God bless em’ all!

dove peace community art project

This is the completed second mural.


A Simple Christmas Keepsake Idea for You

Xmas Big Picture Publishing

Our Christmas tree is a bit like a scrapbook. Many of our tree ornaments have stories behind them, or they mark obsessions or events in the lives of our children. I like this because these decorations come out once a year, and since they’re focused around a holiday tradition it makes sense to save them. As our children have grown older and we hang these decorations, Mollie and I are often reflective, and filled with gratitude over how the personalities of our children have born fruit in their adulthood over each passing year.

I want to share a simple, simple idea with you for an ornament that can become an heirloom for your family. This is one of my favorite keepsake gifts that I have given to Mollie because it recorded a specific point in the lives of our children. I suppose it’s really a variation of the plaster-cast-hand-print craft that we have probably all received at some point as parents, except I never really knew what to do with all those plaster casts. (I think we have them somewhere!…)

craft gift idea xmas

In this case, I had each child put his or her handprint in white on a red glass Christmas tree ornament. I put the age of the child next to their print, and the year. For the space that was left I asked the child what they want the ornament to say. (Usually it was something like “Merry Christmas Mommy!” and, “Love, child’s name.”) You probably need to do this before your child’s hands get too big!

I started with my oldest two when they were 3 and 1 and a half years old. After that, in subsequent years I decided to only do one handprint per ornament. The kids got into this because they knew we were making a Christmas present for Mom. I still remember each child’s reaction as I brushed paint on their tiny hands during the handprint process:

Caleb, who is legally blind and very tactile, got a big grin on his face.

Lee became very serious about the importance of the task, and did his best to carry it out perfectly.

Sierra giggled out loud and said it tickled, and that the paint was cold.

Joel kept making a fist, once he figured out I didn’t want him to make a fist.

Renee freaked out because she thought it was gross, and I had to reassure her that the paint would wash. off.

So that’s it! All you need is:
A set of large matching ornaments set aside for this purpose. I used white acrylic paint for the handprints, and green and gold paint for the lettering. Acrylic paint cleans up with water. I suppose you could also use latex (not oil base) house paint. (Don’t use poster paint as it will come off, unless you want to clear coat the ornament when you’re done.) You might want a small, pointed brush for the lettering, but a medium size, soft, flat works best for brushing paint onto hands.

A handprinting tip:
In order to increase your chances of getting a legible handprint, instruct your child to spread his/her fingers apart slightly before printing. (You might need to model this for them.) Then, guide the hand gently onto the ornament and pull the ornament away once you think a good impression has been made. If the hand slides around once it’s on the ornament you will have a globby smudge rather than a handprint. It might help to put the heel of the hand on the ornament first and then lay the fingers down. Also, you only need a thin layer of paint on the hand.

A final thought is that you might consider using plastic ornaments. I prefer glass, and we happened to have a matching set on hand, but I’ll be sad if ours get broken someday.

I’d love to hear from you if you decide to try this!

Brief book update: I’ve finally started illustrations for the next book, The Friendly City. I’ll keep you posted on progress.

Thank you for you support – I hope you and your family have a joyful Christmas season! May God reveal Himself more clearly to us all in the coming year,

Scott

christmas-tree-angels

Dad says all the angels have to go at the top of the tree…

A Fun Craft Idea That You & Your Kids Can Make For Your Spouse

arts crafts gift ideas for children

Tiny items on these frames include small erasers, buttons, fake pearls, sea shells, Barbie shoes, beads,  hair barrettes, various game pieces, and a couple of pictures cut out of cereal boxes…

I’m sending this out early enough so that you and your kids can get this done before Mothers’ Day. Or Fathers’ Day. It’s a simple idea, easy to do, and yet the final result is something that will bring a smile to your spouse’s face for years to come.

The end result is a functional picture frame that reflects your child’s unique personality.

When my kids and I made the frames pictured here, my grand scheme was to make a frame with a different kid each year. Their frames still hang in our bedroom. The idea was inspired by looking at a lot of “found object” artwork while I was working as an artist at Hallmark Cards Inc. years ago.

The idea is to completely encrust a bare frame with small found objects of your child’s choosing. I did not disallow created objects, but the overall effect was to end up with a found object piece. One of my kids created a tiny drawing to put on her frame. Some combined objects. One cut up tiny pieces of felt to fill in so that no white spaces showed through on his frame

Your child’s personality will come through in the objects they choose. My oldest son was big into nature, so his frame reflects this, including turquoise-colored aquarium rocks, acorns, and a rubber insect. (Fittingly, his photo features him with his butterfly net.) His younger brother was more into playing with the process and finding things on the street, (which we washed.) My oldest daughter was a girly-girl and wanted lots of pink items and cute things. Even with the differences though, the frames still all look great on the wall together because they all share a similar aesthetic.

There is not much to say about the process. We used Elmer’s glue to attach the items to the frames. I cut my frames out of Foam Core board, but you could use a simple purchased frame. With my last 2 kids I switched from white Foam Core to black Foam Core (below,) since the black isn’t as distracting if the board shows through. My plan was to clear coat the finished encrusted frame to protect the items and to help keep them from falling off over time, (which I will still probably do, perhaps when I retire.) I mounted black and white photos in our frames because the frames themselves were so colorful, I thought black and white photos would stand out better, but that’s just me.

Craft and gift ideas for kids to create

Tiny items on these frames include small toys, pieces from a broken Mouse Trap game, a reflector from a bicycle pedal, costume jewelry, old computer key pad buttons, and Grandpa Walker’s campaign button (which would have otherwise disappeared into oblivion) These two siblings obviously influenced each other…

Below are the dimensions I used for my frames. Of course, you can make yours larger, but if you make a two foot long frame it may take the rest of your kid’s childhood to cover it with small objects!

Found object frame schematic

If you and your spouse share this email and you decide you want to do this, you might want to ask him or her not to read this so as not to spoil the surprise. If you decide to make frames with your kids, I’d love to see the result! Send me a photo of your finished product and I’ll post it on my Big Picture Publishing Facebook page.

Have fun, and happy crafting!